Friday, December 9, 2016

Moria: Monsters

This game.

This goddamn game.

Okay, so I'm irritated with Moria, but really what I really should be typing is "my goddamn self", because I need to quit.  I need to quit, put this game behind me, move on to other games and never think of Moria again.  I could be playing something good.  Better yet, I could be playing something short.  But no, I'm still trying to beat the goals I set for myself in Moria, and could be doing so for months to come.

As you might have guessed, my character Robilar died.  Worse, he died when I was super-close to my goal.  I wanted to reach Level 50 of the Forest so that I could search for the Reaper's Ring, but I was killed by a Fire Elemental on Level 52.  (I was on a lower level than my target because I found stairs on Level 47 that went down multiple levels, and I was trying to make my way back up.)  I don't feel as though I made a mistake.  I was following my usual routine, cycling through the various attack forms, and when my Vitality dropped below 40 I tried to run away as usual.  And I failed.  And I failed again.  I failed over and over, while this group of Fire Elementals burned me to death.  It had been literally weeks since it took more than two attempts to run from a battle, so I don't know what the hell happened here.  Perhaps the difficulty level of the monsters ramps up after Level 50.

To my credit, I didn't miss a beat in creating another character and starting over.  My new character inherited a load of great items from my previous guy's guild locker, which has made surviving the early stages of the game really easy.  For the last week I've been grinding to get my stats back to a respectable level, and soon I'll head back into the Forest and try to make it to Level 50.  The good news is that I have the maps, so getting there won't take nearly as long.  Unless I die again.  Without the enforced patience that map-making provides, it's going to be hard not to descend too quickly.

To end this update on a more positive note, I completed my second goal and became the guild master of the Circle of Wizards.


There was nothing to it: once my Wizardry was higher than that of the previous guild master, I went to the guild and got the above message.  The only benefit of being the guild master seems to be getting another attack with your primary stat.  When casting spells, I could kill up to five monsters per round.  Other than that, nothing, which is a shame.  Still, it was nice to check off goal #2.  Now all I need to do is find that Reaper's Ring, and I'm done.  I may just throw an actual real-life party when that happens.

Now let's turn our attention from the fact of my death to the monsters that have been inflicting said death.  As I've mentioned in previous posts, the monsters encountered are different depending on which dungeon you're in; because I've spent the vast majority of my time in the Forest there are a decent number of monsters that I've never encountered.  At first they're encountered solo, but gradually their numbers increase the deeper you explore the dungeons.  They also start appearing in multiple groups, up to a maximum of three types at once.  I don't know if there's a cap on the number of monsters that can appear in each group.  I got to level 52, and was encountering groups with up to 15 monsters in them.  The dungeons have 60 levels each, so I can't imagine that the group sizes would get much larger.  The monsters definitely get stronger as well, but it's difficult to say by how much, because all of the number are invisible.  All I had to gauge it on was the damage dealt by my magic missile spells; by level 52, I was casting spells that dealt over 100 points of damage that monsters were surviving.  At the beginning that number was much lower (around 15-20), and it gradually increased as I descended dungeon levels.

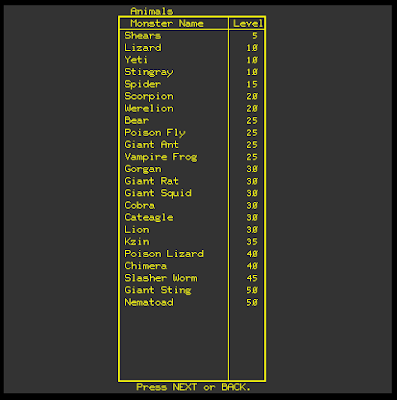
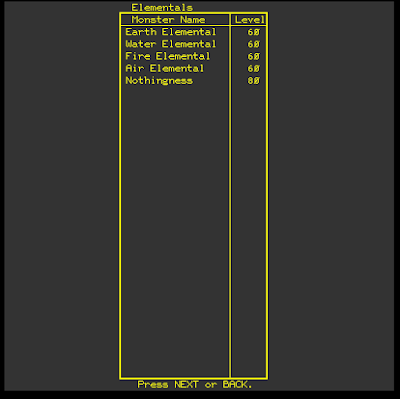
There are eight categories of monster in Moria.  I'm just going to show the lists for each type, and write a bit about my experiences with them.  You'll see below that each monster has a Level, ranging from 5 to 80.  I don't know exactly what this number represents, other than a rough guide to which monsters are the most powerful.


There's not much to the humanoids in this game; they're all bags of hit points with no particular strengths or weaknesses that I've been able to discern.  There are a bunch on this list that I've never encountered: Seekers, Fritzes (?), and Sun Warriors being the strongest.  Killer Elites are deadly to lower level characters, but even though all monsters get stronger on the deeper dungeon levels, they eventually become a negligible threat.


Of the list above, Reapers are the deadliest, and with a Level of 90 they are theoretically the deadliest monster in the game.  I can confirm that: they hit often, and do a lot of damage.  Undead, however, are all super-weak against the Holy Word prayer.  It almost always kills them instantly, which turns the most dangerous monster in the game into a pushover.  I'm not complaining.


None of the Mythical monsters are particularly dangerous.  I've had low-level characters killed by Manticores, but it's not long before they can be easily dispatched.


Again, the Animal group has some monsters that are dangerous early in the game (Slasher Worms, Nematoads) but easy to kill later on.  A lot of the monsters on this list are susceptible to the Sleep spell.  There are also a few that give you food when you kill them, Lizards and Bears in particular.


The Priest class isn't all that deadly, but it does have one monster that is the enemy of starting characters everywhere: the Iconoclast.  With a Level of 75, it's by far the strongest monster that can be encountered in the Wilderness, which is the area that beginning characters will be doing most of their grinding.  Most of my characters that didn't make it past that stage were killed by Iconoclasts, which are hard to kill and (because your Cunning score is still low at that stage) hard to run away from.  Priests are weak against Dispell Magic, but that's not helpful early on because spellcasting drains a lot of Vitality.


All of these monsters are tough, with no obvious weaknesses, and remain so for the entire game.  Nothingnesses in particular are difficult to kill, and can deal a lot of damage at once.  Battles against large groups of Elementals can last a long time, with multiple instances of running away to heal before returning.


Magic Users are almost completely immune to spells.  With one exception they're not all that hard to kill, though.  That one exception is the Wondark, which is one of the monsters I hate most in the game.  When fighting large groups of monsters, I rely on spells to clear them out quickly (using the multiple attacks gained through advancement in my guild), but that can't be done with Magic Users.  They have to be killed one by one using the other attack forms, and with Wondarks that can take a while. 


High Priests can be dangerous, but other than that the Lawful monsters aren't all that tough.  I'm not sure what makes them Lawful, in the D&D alignment sense of the word: they're just as hostile as every other monster in the game, and they pal around quite readily with them as well.  I sometimes wonder if there's a non-violent way around these fights, but then I remember how much fun it is to carve through a pack of 15 Hobbits.

Well, that's it for monsters.  I have one more post for Moria lined up, on equipment, and there's a lot to discuss on that topic.  After that, I think I'm tapped out on this game.  If I haven't found the Reaper's Ring by then, it's probably time to shift Moria into the background.  I'll keep playing it, but I won't be blogging about it.  Instead I'll move on to the next game on my list, which is Oubliette, another PLATO CRPG that may or may not eat up the better part of a year.  Huzzah?

Friday, November 18, 2016

Moria: Magic and Guilds

Before I settle in to discuss how magic and guilds work in Moria, I feel like I should give a progress report on where I am with this game, because it has ground this damn blog to standstill.  Rest assured, eventually I'll play something else.  In the meantime, this is how I'm doing:
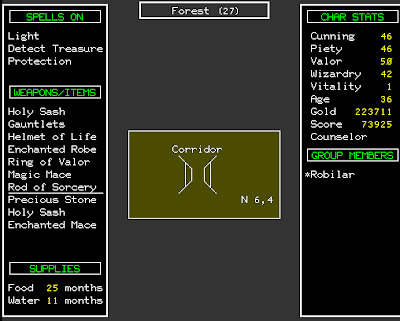
One point away from cutting my wrists.

So yeah, I had a close shave there.  It's not the only one if I'm being honest, and any one of those moments of carelessness could have had me back at square one.  Other than those few slip-ups I've been exploring the Forest dungeon slowly but surely, and have just started mapping Level 38.

When I started this game, I set myself three goals.  The first was to make it onto the Hall of Fame's Lifetime Achievement section.  I can check this one off, because there's my character Robilar sitting 16th from the top.

I've moved up a spot since I took this screenshot.  Eat it, Genesis!

My second goal is to become the Guildmaster of my chosen guild, the Circle of Wizards.  This is done by increasing the relevant stat, in this case Wizardry.  Once that stat reaches 20 you can join your chosen guild, beginning at the rank of Apprentice.  At 30, you reach the rank of Journeyman, at 40 you reach the rank of Counselor, and at 50 you reach the rank of Master.  My score is currently a healthy 64, which makes me a Master Wizard.  (These ranks may be different based on the other three guilds - knights, thieves and clerics.  I haven't explored those options far enough to know.) In addition to gaining the necessary Wizardry, all three ranks above Apprentice required a donation of 1,000,000 gold each.  I'd initially been concerned about finding enough cash, but I needn't have worried about it: Combat is frequent, and on the deeper dungeon levels each battle reliably nets 5,000 to 10,000 gold.  It adds up.

So I've reached the rank of Master, but I'm not the Guildmaster yet.  To do that, I need to become the guild member with the highest Wizardry score.  The current Guildmaster has a Wizardry of 74, which seems difficult to get to, though not insurmountable.  My main worry here is whether this character is still active.  If it is, I'll struggle to get there.  If not, I should make it.  I've been using my spells a lot more lately, and my Wizardry is steadily climbing.

As for my third goal, that is to find the Reaper's Ring.  According to the help files, the Ring moves down a dungeon level every time it is found.  There's a list of 'Finders of the Ring' that can be viewed, which states that the ring was last located on Level 49, so if I'm interpreting it correctly I should find it somewhere on level 50.  The important question to ask here is, will it be found on level 50 of the Forest?  Or will I have to explore all of the other dungeons as well?  Christ, I hope not.  This game could be over after 12 more dungeon levels, or it could take another 50 to 150 on top of that.  I'm dreading the prospect.

One goal that I've set for myself in previous games is to map the whole thing completely.  That's one that I'm skipping for Moria.  With 240+ dungeon levels (and very large ones at that), it's just too big.  I might reconsider if the dungeons had anything to find in them, but their vast emptiness only reinforces my decision to forgo making complete maps.  I've fully mapped out the City, and the single level Wilderness, as well as the first eleven levels of the Forest dungeon; it was a good way to enforce patience while I explored, and to ensure that I did enough grinding before descending to more difficult areas.  Eventually I got to the point where it felt like my character was strong enough to survive just about anything, so I stopped making complete maps.  Now I descend as soon as I find stairs leading down, and I'm progressing a lot faster than I was before.  Occasionally I find stairs that descend multiple levels at a time, which is always a cause for a minor celebration. 

In the last few days, though, since I hit roughly level 35, I'm finding that my progress has slowed again.  The battles are getting more difficult (and the enemies more numerous), and quite often I find myself running away to heal before returning to finish the battle.  If a battle is large enough I might find myself fleeing two or three times before I win.  Healing in Moria happens in real time, so I have to literally wait for minutes while my character regains Vitality.  That's why this game is perfect to play while watching TV (wrestling in particular is great for this, because it rarely requires my full attention), or browsing the web, or reading comics.  So I get some other things done while I'm playing Moria, but that time adds up, and it means I'll be stuck on this game for a while longer.  I don't know if it will get to Game of Dungeons v8 territory (a game which took me a solid year to complete) but I doubt it.  I'm progressing steadily, and my only real concern is getting killed and going back to the beginning.  That won't happen unless I do something really stupid; this is a long game, and it punishes impatience, but it's also predictable.  If I do die, the fault will be 100% my own.

MAGIC

And now, on to one of the topics I want to dissect today: magic. Magic in Moria is rudimentary at best: there are five combat spells, five non-combat spells, and five prayers that can be used in combat.  All of the spells (though not the prayers) drain your Vitality when cast.  This drain has lessened as my Wizardry increased: when I started the game, I was losing 10-15 Vitality per spell cast; now I lose 2 or 3 points.

That decrease in the loss of Vitality has meant that using spells in combat has become a lot more viable, and I often find myself spamming magic at my foes now rather than alternating between attacks.  What's made this even more effective is the way that spellcasting is affected by gaining ranks in the Circle of Wizards (as I detailed above).  As a Journeyman, I occasionally found that my character would cast two spells in a single attack.  As a Counselor this increased to three, and as a Master it increased again to four.  Most of my spell attacks now affect multiple foes, and there's little more satisfying than killing four enemies at once with a single spell.

And now, a bit more on the spells themselves, and what I've discovered about them during play:

Combat Spells:

Paralyze: This spell freezes the foe in place, killing it instantly.  To be honest I don't use this one much, and I haven't figured out which monsters are especially vulnerable to it.  I probably ought to spam this one more often to find out.

Charm: The Charm spell makes the target lower its guard, allowing you to slip in and kill it.  It seems to be more effective against humanoid types, although I don't feel like I've established that definitively.  Again, this is a spell I should try more often.

Dispell Magic: This spell turns the target's magic against it, killing it instantly.  I would have thought it would be most effective against spellcasting monsters, and that's the case against priests and the like.  Against wizard-types, it's almost completely ineffective.  I'd previously written that it was good against elementals, but now I'm not so sure about that.  What it works really well against (really well indeed) is undead.  Undead just aren't a threat in Moria, because they're so easily mowed down by this spell (or the prayer Holy Word).

(Note the distinctive misspelling.  That's exactly the way that it was written in the original Dungeons & Dragons booklets.)

Magic Missile: A damage dealing spell that hits pretty much everything with equal effectiveness.  On dungeon level 38 I'm finding that it kills enemies about half the time, and when it doesn't it deals up to 60 to 70 points of damage.

Sleep: Puts the target to sleep, allowing for an instant kill.  This is the spell that I use the most.  It's really effective against animals and mythical beasts like Chimera, but it works on just about everything else except for undead and spellcasters.

As I mentioned above, the number of spells cast in a round increases depending on your guild rank, so long as you're a member of the Circle of Wizards.  (I wonder if the same holds true for the other guilds, and the stat most relevant to their members?  I doubt that I'm ever going to find out.)

Combat Prayers:

Much like the combat spells, these can only be cast during battle. Their effectiveness is based on Piety rather than Wizardry, and they don't drain Vitality like spells do.

Holy Word: The prayer that I use the most.  When successful it instantly kills a single opponent, and it almost always works against the undead.  My Piety stat is my second-highest, because I spend so many combats with undead enemies just using Holy Word over and over again.  It's so good against them that it's pointless to use any other attacks (although the Dispell Magic spell is almost as good).

Escape: This prayer allows you to escape from battle, but to be honest it doesn't seem any more effective than using the Run command.  I suppose that it might be a better choice if your Piety is higher than your Cunning, but my scores are within a reasonable distance of each other.  As such, this isn't a prayer that I ever find myself using.

Miracle: Apparently this prayer summons divine aid to destroy every enemy on the battlefield.  I wouldn't know, because it's never once worked for me.  Every few battles or so I try it out, but so far nothing has resulted.  I suspect that I need either a higher Piety or to be a member of the Brotherhood (the priest's guild) for this prayer to be consistently useful.

Unction: This one gives you some healing when your Vitality drops below 50.  It's not worth using.  It works so rarely and heals so little - around 5 to 10 points of Vitality - that it's a better tactic to either keep attacking, or just run away and heal naturally.

Non-Combat Spells:

Finally, there are five spells that can be cast outside of battle.  Most of these are very good, and I use them quite often.

Light:  I have this spell on all the time, because it reveals secret doors.  It also lasts basically forever, as it only disappears when you return to the city.  It's indispensable for mapping purposes.

Passwall: This spell allows you to pass through walls.  You can't beat the game without it, because there are dungeon areas that are completely blocked off and inaccessible via regular or secret doors.  There are even some stairs in these areas, so the importance of this spell can't be overstated.  It can be a problem in the early stages of the game, though, because it works so infrequently, and every casting drains around 10 points of Vitality.  It's easy to get impatient and keep exploring after using most of your Vitality on Passwall spells, and I lost more than a few characters that way.  On the flip side, this spell is a great way to grind your Wizardry stat, especially if you're prepared to spend a while casting it on walls in the City, where there are no random encounters.

Precognition: This is the only non-combat spell that I don't use.  It tells you whether a particular group of monsters has any treasure, which I suppose is useful in gauging whether that group is worth fighting.  Personally I consider every group worth fighting, if only to grind up my stats.  Treasure is a secondary concern.

Protection: This spell protects you from attacks, but it's hard to say just how effective it is.  My gut feeling is that I get hit less when it's on, but it's not a large enough difference that I can be certain about it.  Still, I have it on all the time, just in case it is aiding my survival.  It has the same effectively infinite duration as Light, so it's not a chore to have on at all times.

Teleport to City: This spell is only available to members of the Circle of Wizards, and is the main reason that I chose that guild in the first place.  Without it, getting back to the city would require slogging back through the entire dungeon, and now that I'm on level 38 that does not sound at all enticing.  With it, I can get back there with the press of a few buttons.  As soon as I read about this ability I knew which guild I'd go for, and I can't imagine playing the game without this spell.

Overall, the magic system of this game is a solid one, but it lacks the clear definition of the other PLATO RPGs, such as The Game of Dungeons.  The other games had less spells, but their effects where tangible.  In Moria too many of the spells feel interchangeable, or ineffective.  It's not as obvious how the spells affect the game, and that hurts it a lot.

GUILDS

As I've mentioned before, there are four guilds that you can join in this game: the Thieves Guild, the Brotherhood, the Union of Knights and the Circle of Wizards.  Each of the guilds is located in the city, and they're really the only reason to explore much of the city at all.  The vast majority of the info I have to impart here is about the Circle of Wizards.  I've tried characters in all four guilds, but the Circle is the one guild I've progressed far enough in to notice any benefits.

Each of the guilds is tied to one of the four stats: Cunning for the Thieves Guild, Piety for the Brotherhood, Valor for the Union of Knights and Wizardry for the Circle of Wizards.  You need a score of 20 in the relevant stat to join the chosen guild.

(This is where I'd normally detail the process of gaining ranks, but I've covered that above already.  As I've also mentioned, the main benefit of advancing in rank seems to be getting extra attacks with your chosen stat.  The only other thing I have to add is a confirmation that the ranks of Journeyman, Counselor and Master are used by all four guilds.)

Each of the guilds confers a special ability.  Thieves  have a greater chance of finding magic items; knights take less damage, and have a chance of beheading their foes; members of the Brotherhood can raise the Vitality of their group (when teamed up with other players); and as I've already mentioned Wizards get the spell "Teleport to City".  I'll say it again: that last ability, at least on paper, trumps anything the other classes have to offer.  I'm not even sure if the special ability of the Brotherhood can be used in single player games at all.

Chillin' at the guild.

The guilds grant more than just abilities, however.  There's a bank where you can store and retrieve gold (in bags of 200,000 coins each).  There's a bond fund you can contribute to, which goes towards getting fellow guild members out of prison (more on that later).  There's an item locker, where you can store your surplus weapons and items.  It's always handy to have some powerful items in there, because if you die then your stored stuff gets handed down to your next character (who is presumably some sort of heir).  It's a nice way of ensuring that new characters don't start completely from scratch.  Finally, there are the transport options, which let you teleport to either another player in the dungeon, or to your own camp.  You can set a camp anywhere in the dungeon, and always use your guild to return to it; this, in combination with the Wizard's teleportation ability, has saved me a ton of time going back and forth.

You can attempt to rob a guild that you're not a member of, but I'm loathe to try it.  I've had a go with newly made characters, but never succeeded.  Failure results in arrest, and a primitive screen shot of some prison bars.  Apparently you can be bailed out by fellow guildmembers, but I've never attempted it with a character who was advanced enough to have a guild.  I'd love to capture the screenshot, but I don't want to risk losing my character forever.  Alas, in games with perma-death there is no room for experimentation.

So far, I haven't burned out on Moria yet.  I wouldn't say I'm exactly enjoying it, but it's the sort of game I can play on autopilot while doing other stuff.  It's almost a zen, calming experience, interspersed with occasional bursts of panic for the moments when I get a little too close to dying.   The real test of my resolve is going to come if I discover that I need to explore a different dungeon.  I don't know if I can bear going through the whole process again, but I'll deal with that when the time comes.  (Who am I kidding, I'm going to hack away at this game until I'm done, because I'm insane.)

Sunday, October 23, 2016

Moria: Combat

As I've mentioned in previous posts, beating Moria is going to take me a long time.  The game is big, death is permanent, and there's no way to make the experience shorter.  What that means is that the blog will be tied up with this game for some time, and I've decided (perhaps unwisely) not to have any other games running in the background.  I want to just get Moria out of the way, and indeed to get the whole PLATO era of CRPGs over and done with, so I'm proceeding as quickly as I can.

What that means is that I have to make this game last as far as blog posts go, so I'm going to do a series of posts discussing every facet of the game in exhaustive detail.  I'm not sure how interesting it will be to read.  I'm not even sure how interesting it will be to write.  Perhaps I'm just trying to make you all as sick of this game as I'm getting.  Nevertheless, let's crack on with my next post in the series: Combat.

Ah combat, the central part of most classic CRPGs.  Combat in Moria is frequent, but it's also quite quick.  In any 6x6 section of the map you might get about five battles, but most of them are over in under a minute.

The PLATO games that precede Moria (The Dungeon, The Game of Dungeons v5, and Orthanc) had rudimentary combat systems, in which most of the tactical options stemmed from spells, and the immunities of the various monsters.  Moria probably has a similar level of tactical play (i.e. not much), but it has a good number of options to choose from in battle:

(F)ight: Your standard melee attack, which is what I mostly default to.  The success of this attack is based on your character's Valor score.  Damage is also based on Valor, versus the Defense of the monster you're attacking.  Up to level 16 of the Forest dungeon, I found that my character's damage would display from 1 to 7 points, and anything higher than that would kill the monsters outright.  Earlier today I started exploring level 19, and now monsters are surviving blows that deal up to 10 points of damage.

Attacking a Zombie, and being attacked in return.

(T)rick: This attack is based on your character's Cunning score.  The idea here is that you use your guile to get the monster to let its guard down before striking a surprise blow.  If it works it kills the enemy instantly.  I'm not sure how this is determined.  My character's current Cunning score is 38, and I find that using Trick works about half the time.  Perhaps it's just a straight percentage chance of success?

(P)ray:  Praying is based on your character's Piety score, and gives a whole bunch of options.  The one that I use the most is Holy Word, which instantly kills a single monster (I find that's it's super-effective against the undead).  You can pray for escape, which is not an option that I've ever used.  I didn't even realise that it was a thing until doing some reading for this post.  When I need to flee, I use the Escape command detailed below.  The third Pray option is to pray for a miracle, which calls for divine intervention from your gods and kills every single enemy on the field.  I haven't tried this one much, because it's noted in the instructions that the gods tire of this if its done too much.  I'd rather not deal with the repercussions of angering the gods, especially in a game with perma-death in effect.  Besides, on the occasions when I have tried it it's never worked.  The final Pray option is healing, which only works when your character's Vitality has dropped under 50.  This is another one that I don't use much, because once I drop below 50 Vitality I start trying to escape.

(B)ribe: This is another option that I didn't remember was in the game.  I was loathe to test it out, as I wasn't sure whether the choice of item to bribe with was mine, or a random one.  I ended up stripping my character completely of gear, taking an old Hood that I had stored in my guild locker, and hunting for a battle in the wilderness, where the monsters are the weakest.  I found a leprechaun, and was pleased to discover that the game let me decide what items to offer.  Alas, nothing I tried worked.  The leprechaun took my Hood and about 1,000 gold, and still wouldn't accept my bribe.  I killed him with my bare hands, and - predictably - the stuff I had given him wasn't included in the treasure I found after the battle.  I doubt I'll be going back to this option.

Mythologically speaking, I probably chose the worst 
possible monster to attempt to bribe.

(R)un: This is the most vital option in the game.  Seriously, knowing when to run is the single most important tool for survival that the player has in Moria.  Success is based on your Cunning score, and you can attempt it over and over again until you escape.  You don't lose anything as far as I can tell, and you're still in the same square you were in before the battle commenced.  The monsters are still there as well, which was the source of a few of my early deaths: if you return to that square, or refresh while standing on it, you'll be attacked again.
  The instructions mention that you lose a share of treasure when you run from a battle, but I'm pretty sure that's a multi-player thing.

Running from some Werelions.  I could totally beat them, this 
is just for the blog.

(E)vade: This option keeps you in the battle, but makes you more difficult to hit.  It's probably quite useful in multi-player games, for when you're wounded but want to stay in a battle to claim your treasure. In single player mode it's pointless.

(C)ast a Spell: The effectiveness of spells is based on your Wizardry score.  There are five different combat spells in the game, most of them quite similar on the surface.  Paralyze freezes the target monster, killing it instantly.  Charm makes the monster think you're it's friend, allowing you to kill it instantly.  Sleep puts the target to sleep, permanently.  Dispell Magic turns a monster's magic against it, killing it instantly.  (Sensing a pattern?)  The outlier is Magic Missile, which simply deals damage.
  In theory the various spells are more or less effective against certain monsters, but I haven't noticed it much during play.  Sleep seems to work well against normal animals like lizards and spiders, while Dispell Magic seems to be effective when facing undead and elementals.  Magic-Users are immune to spells, as far as I can tell.  I probably need to figure these vulnerabilities out, because I get the feeling that I'll be encountering deadlier monsters in the near future.
  This is the option that I use the least in combat, because each spell you cast drains your Vitality.  The spells seem to be no more or less effective than any other option, so choosing the one that brings you closer to death with every round seems a bit foolish.

Yell for (H)elp: This command puts out a general cry for help to any other players that are in the same section of the dungeon with you.  It's yet another multi-player option that I haven't been able to explore.  (I'm tempted to try to set up a second account, and run another character on my wife's laptop just to check these options out.)

(m)essage everyone or (M)essage an individual: More options for multiplayer.  I'm not sure why you'd be sending messages to people in the middle of battle, but it must have had some uses.

In the earliest stages of the game you only ever encounter monsters that are by themselves.  As you descend dungeon levels the number of monsters grows, and you will also be attacked by multiple groups (though never more than three groups).  I'm currently on the 19th level of the Forest, and most of my battles are with three monster groups with up to 8 creatures in each group.

(Some of the groupings can start to look ridiculous.  5 Hobbits, 7 Zombies and 4 Bears?  Sure, okay.)

It sounds overwhelming, but I've noticed that I never take more damage in a single exchange than I would from a single monster.  (The toughest monsters can deal up to 12 points of damage.)  An arrow next to the names of the monster groups determines which one you will attack that round, and which one attacks you.  So while you're not really in control of which monsters you're attacking, and you can't target anything in particular, the monsters can't gang up on you either.  It's not at all realistic, but it helps a lot with survivability.

In most combats I have a set routine.  I open with a spell (unless my Vitality is already low).  Then I alternate as follows: Fight, Trick, Fight, Pray, Fight, Trick, Fight, Pray, and so on.  The idea here is to keep all of my stats going up at an even level, with a greater focus on Valor.  The only problem is that Wizardry doesn't get used as much (a problem compounded by the fact that my character is a member of the Wizard's Guild), but that's offset by frequent use of spells outside of battle.

I'll shake the routine up if I encounter some really strong undead, particularly Reapers. In that case, I target those with Holy Word prayers, spamming them until they're all dead.

Other than that, my only tactic is to run away once my Vitality dips below 50.  I might stick it out if there are only a few enemies left, but I don't like to risk it.  This game eats up a lot of my time, and I really don't need to go back to the beginning.

About to flee from some Reapers due to low Vitality.  
The risks I take for you people.

Overall, I think that this is a pretty good combat system for the time.  It's more complex than anything found on the other PLATO RPGs,  but despite all of the options on offer it still boils down to mashing the attack button over and over again.  Perhaps it's more interesting when multiple players are involved, but I'm not sure if I'll ever get to test that out.  For me, the most admirable thing about combat in Moria is that it's fast-paced, easy to navigate, and over quickly.  Brevity in a combat system goes a long way.

Monday, September 26, 2016

Moria: Examining the Interface

I'm going to be playing this game for quite some time to come, so if I have to post once a week or so, I'll need to discuss every inch of this game in depth.  In more modern games, that could be done by talking about the story, and the various decisions I made through the game.  Alas, games of the vintage of Moria don't have a story, and the games are less about decision-making than repeating the same processes and routines over and over again.

So rather than focus on story and decisions, I'll be doing a series of posts on different mechanical aspects of the game.  Luckily, Moria is really complex for the time.  In today's post I'm going to put up a regular screenshot, and dissect every little facet of it.


I'll begin with the main view, which is the greenish/brown rectangle in the middle.  The background colour changes based on which dungeon you're in; green/brown denotes the Forest.  The view is similar to later RPGs like Wizardry, Might & Magic and the Gold Box AD&D games: a wire-frame maze shown from a first-person perspective.  Indeed, this is probably the very first of its kind.  The square directly ahead of my character has a door to the north and a door to the east.

Written at the top of this rectangle is the word "Room".  The dungeons are designed in alternating blocks of Rooms and Corridors, each one 6x6 squares.  The Corridors are composed entirely of thin straight passages, with blocks of empty space that can only be accessed by casting a Passwall spell.  There's nothing of interest in the corridors except for wandering monsters.  The Rooms have more interesting layouts that use the entire 6x6 space, and they are where you'll find stairs, water holes and the occasional magic item.  You'll also see "N 2,1" written in the bottom corner: this shows the direction you're facing (in my case, north), and your coordinates within your current Room or Corridor.  I'm currently 2 squares east and 1 square north from the bottom left of the Room.

Up the top, right in the middle is a square that says "Forest (11)".  Obviously, this shows the dungeon you're in, and the level.  I'm currently mapping Level 11 of the Forest, out of 60 levels total.  I have a long way to go, but then again the feeling that I'm a sixth of the way there is quite heartening.

Let's go to the bottom right section, labelled "Group Members".  My group has only one member, and that's my character British (no awards for guessing my inspiration here).  The game can be played in multiplayer, where you can join other people's groups and fight together.  There aren't exactly a whole lot of people playing the game these days, so I haven't had the opportunity to test these features out.

Above that, we have "Char Stats".  Cunning can be used to trick foes in combat, and also helps you avoid traps when opening chests.  Piety is used to pray in combat, and can be used to destroy foes or to heal your character.  Valor measures your general combat prowess for when you just want to whack a monster with a sword.  Wizardry determines your spellcasting, for combat spells as well as those cast during exploration.  Your stats go up as you use them, although the gains become less frequent as the numbers get higher.  My stats range from 30 to 35, as I've deliberately tried to keep my character balanced.  Perhaps I'd be better off focusing on one stat over the others, but I feel more comfortable trying to advance them all.

Each of these stats is also used to determine advancement in whichever Guild you join.  You can only join one guild, and there's one for each of the four stats.  A score of 20 is required to join the Guild as an Apprentice, and for every ten points thereafter you can raise another rank.  Once your score hits 50 you can become the Guildmaster.

Vitality starts at 100, and is the equivalent of hit points: you lose them when hit in combat, and when they reach zero you're dead.  Casting spells also drains Vitality, but spells cost less the higher your Wizardry score.  Moria progresses in real time, which includes healing: if you leave an injured character motionless for a minute or two your Vitality will be restored to full.

Below that is Age.  Characters begin at age 13, and gradually get older as time progresses on the game.  Apparently you can die of old age at some point after you reach 100.  I haven't gotten there yet, but I hope it doesn't happen to my character before I can achieve my goals.

Gold is self-explanatory, and I never seem to have enough of it.  There's a huge selection of weapons and armour to buy in the shop, some of which costs well over a million gold.  You also need money to advance your guild rank.  My character British is an Apprentice in the Circle of Wizards (you can see his rank written at the bottom of this section).  My Wizardry score is high enough to raise my rank to the next level, but I also need to have donated a million gold to the guild.  So far I've given them 200,000, but grinding for gold is a slow process.  I'd like to buy better gear, but there's always that trade-off between equipment and saving for the next guild rank.  I can't foresee getting to a point where I'll ever have too much gold.

I'm not entirely sure about the purpose of the Score.  It goes up as you defeat monsters, and I think it's just there to determine your place in the Hall of Fame.

Now to the left-hand column.  "Spells On" simply shows which spells you have active.  I have two spells running: Light and Protection.  Light shows secret doors, and Protection makes you harder to kill in battle.  There's no reason not to have them on all the time: a single casting lasts basically forever, only running out when you go back to town.  The other spell I could have running is Precognition, which lets you know whether monsters have any treasure.  I'm more than willing to fight monsters regardless of any treasure they might have, so I don't see a need for it.

Below that is "Weapons/Items", which shows what I'm carrying.  Items above the line are equipped, and those below the line are unequipped.  Each item equipped has a rating for Attack and Defense.  I currently have two weapons equipped: the Magic Javelin and the Rod of Fear.  Once your Valor reaches 30 you can wield two weapons, but before that you can only have a weapon and a shield.  Obviously shields grant a better defense, but as most weapons have a Defense rating of their own I prefer to get my Attack higher and dual-wield; the loss of Defense is negligible.  Unequipped items can be sold at the shops, or left in an item locker at your Guild.

Finally, in the bottom left corner is the "Supplies" section.  You need to carry food and water, and if you run out of either your Vitality will be drained away with every step.  You can buy food and water in the city, but you can also find them in the dungeons as well.  Some monsters (mostly animals) will replenish your food supplies when killed, which is a really neat touch.  There are water holes dotted throughout the dungeons, although some are poisoned and will drain your Vitality.  This is probably the first CRPG that requires tracking of food, but thankfully it's easy to manage, and running out isn't all that punishing.

So that's the interface of Moria: it works very well, and innovated a lot of RPG staples that we'll be seeing at least until the mid 1990s.  I might have some problems with this game, but the way it looks and functions isn't one of them.  (Except for that tiny, tiny view.  Is there any reason for it to be so small?)

The next few posts will be on various aspects of the game: monsters, spells, combat.  Anything else I can think of.  Gotta fill that time, you know?  This game is a behemoth.

Sunday, September 11, 2016

Moria: Let's Try This Again

I played Moria for a while last year, until eventually giving up.  I always planned to get back and finish it, but the monolith that was The Game of Dungeons v8 intervened, and sucked up a solid year of gaming.  Now I'm back, and with no other games to distract me I plan to go hard at Moria and complete it.

I've posted about the game before, beginning with this post right here, but it's been such a long time that I feel like I should run down the basics again. Here goes.

Moria is, of course, and D&D-style fantasy RPG, originally developed for the PLATO mainframe by Kevet Duncombe and Jim Batton circa 1975.  It's the first ever CRPG to use a first-person perspective, and it may even qualify as being the first-ever multi-player RPG.  Whatever else I say about the game, it should never be forgotten just how innovative and ground-breaking it is.

The game is set in the land of Moria, which is a subterranean realm split into six areas: City, Wilderness, Forest, Desert, Cave and Mountain.  The City and the Wilderness have but one level, and the other four have sixty levels each.  Don't expect the names to correspond to the geography, though: everywhere you go in Moria it's nothing but wire-frame mazes, and the only thing that changes is the colour of the walls.

You can tell it's a forest because the background colour is green.  Sort of.

There are three goals to strive for in the game: making it onto the Hall of Fame, becoming the master of one of the guilds, and finding the Reaper's Ring.  The Hall of Fame is simply a list of the players who have scored the most points.  Points are earned by killing monsters, so theoretically all I have to do to earn a place in the Hall is grind, grind and grind some more.  Becoming a Guildmaster is a matter of raising the relevant stat to 50, and spending a load of gold (about 3 million, if my calculations are correct).  Again, lots of grinding involved here.  The Reaper's Ring is my ultimate goal, and can only be found in the deep levels of the Forest, Desert, Cave and Mountain.  Apparently it drops a level every time it's discovered, and was last found in Level 38.  Once I've located this bad boy, I'm going to call it game over.

That's me: British, Apprentice Wizard.  Sitting last in the monthly records.  
Only 48,000 points to go!

Characters have four stats: Cunning, Piety, Valor and Wizardry.  Each of these corresponds to one of the four Guilds.  The stats are also tied to the four different attack types in combat: trickery, prayer, fighting, and spellcasting.  As you win battles, the stats most used will increase over time.

That's a basic run-down, but the game has loads of features: character aging, food and water, a robust equipment system, spells, and more that I'm probably forgetting.  Then there are the multiplayer options, which I haven't been able to use at all.  This is a game with a lot of stuff in it, at least as far as gameplay goes.

The problem is, that while the game has a lot of stuff in terms of features, it doesn't have a lot of stuff in the dungeons themselves.  It's the same problem I had with The Game of Dungeons v8.  The maps are enormous, but there's nothing in them except for wandering monsters.  It's holding my interest at the moment, but soon enough the long, hard slog will take its toll.

That's all I'll cover for now, as I only intended to do a quick refresher on the game.  I also don't want to exhaust any of the topics too quickly.  I could be at this one for a long while, and I need to make the material last.

Saturday, September 3, 2016

The Game of Dungeons v8: VICTORY (AT LONG LAST)

It feels weird not to be playing this game.  I started playing it on August 28th of 2015, and I finished it on August 28th of 2016.  One year.  And when I say that I played this game for a year, I mean a whole year.   I didn't take any breaks, I didn't go on hiatus.  I played a bunch of other games in the interim, but I always had The Game of Dungeons going in the background.  I played it almost every day.  So when I say that it feels weird, I mean it, because it became a sort of permanent fixture in my schedule.

My last post left off with my capture of the Grail, which is one of two items needed to win.  The other is the Orb, which sits at the bottom of the Caverns, one of three 30-level dungeons in the game.  The instructions mention that the Orb is guarded by a Dragon, but give no guidance as to how strong the Dragon might be, or how it might be defeated.  Version 5 of The Game of Dungeons had a special Dragon Spell that would kill the Dragon instantly, but at the cost of draining every last bit of your magic.  That spell isn't in Version 8, and to be honest it was more trouble than it was worth.  I didn't use it to win Version 5, so I won't miss it here.

The Caverns, despite being the third dungeon, were easier to map than the Tomb of Doom.  There were a few hairy ones; Level 25 was nothing but one-square rooms with doors on every side, and Level 30 was full of hallucination squares, making it impossible to know what was adjacent to my character.  Level 30 was also chock-a-block with teleporters leading back to Level 29, and the constant random teleportation was really frustrating.  There was nothing as bad as the worst levels of the Tomb of Doom, though, which still take the cake as the most difficult mazes I've ever had to navigate.

Level 25 of the Caverns.  Brown lines are for doors, black for walls, 
blue and green for teleporters up and down.  Good luck navigating 
this sucker: remember, every time you enter you'll be in a 
random location.

Looking at my notes, I just noticed that I either forgot to map Level 15, or it got deleted somehow.  I must admit to some small temptation to grind up another character and finish that last map, but there's no way.  I can get obsessive about these things, but even I have limits.

After mapping out the Caverns (with the aid of many Astral Potions), it was time to make the final foray.  As I did when going for the Grail, I made sure to drink a Potion of Revival before heading to Level 30: it would ensure my resurrection if I died, albeit at the cost of all my magical items, including the Grail.  It's not ideal, but it's better than outright death.  This is a hard game, but I'm thankful that there are safety nets in place for players that want to use them.

Level 30 can be accessed quickly by use of the Excelsior Transporter (found on Level 1), at the cost of a small number of hit points.  Getting back up is more difficult.  With an Astral Potion you can easily move up and down between levels, but without one doing so eats up your spell slots.  I was being careful, and the whole process should have gone easily, but I had one last scare that almost ruined everything.

After buying a Revival Potion, I left the Potion Shop and started teleporting myself down, not using the Excelsior Transporter but using my own spell power.  This is what I would normally have done while Astral, and I had gotten into a routine with it.  By the time I realised my mistake I was on about Level 20, and I started frantically teleporting back up.  My spell power ran out on Level 13, and I had to make the long slog back to the surface with no magic to protect me.  I managed it with about 50 hit points (out of 800+), despite one heart-stopping moment where I fell in a chute I hadn't marked on my map and tumbled from Level 4 back to Level 10.  It was one last bit of stupidity and suspense from a game that's provided me plenty of both.

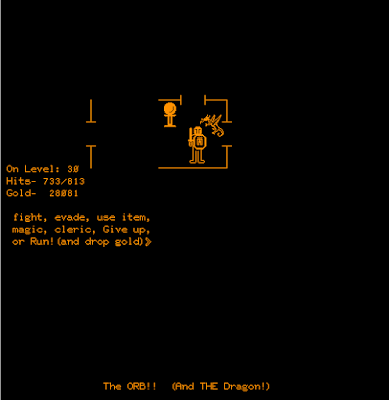
Finding the Orb and the Dragon was, as expected, a bit of an anticlimax.  There's no warning that they're nearby, and I'm not even sure that they're always found in the same square.  They just appeared suddenly as I was exploring, and even though I was actively looking for them it still took me a few moments to register that I'd reached my goal.

The poor old Dragon doesn't even get his own icon.

Killing the Dragon was similarly anticlimactic.  The game's two most damaging spells are Fireball and Lightning Bolt; I wasn't about to try casting a fire spell on a Dragon, so I opted for the Lightning Bolt.  It was enough to kill the Dragon instantly.  Like I said, anticlimactic, but in a game that's so long and time-consuming I'm not going to complain that the final battle was too easy.


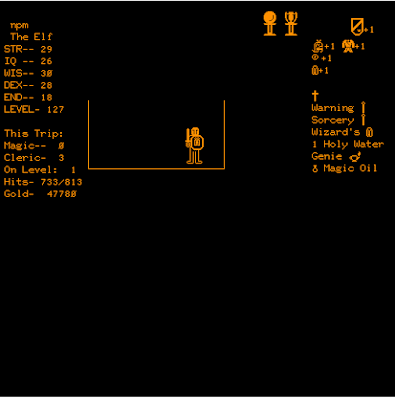
With the Orb in hand, I started teleporting back to the surface.  My magic ran out on Level 9, but I had no trouble in making it cautiously back to the surface.  I took a quick snapshot of my character on the verge of success, to preserve for posterity.


It should be noted that the name 'npm' was something I typed in accidentally (it was meant to be my password).  I could have changed it to something more evocative, but I ended up just going with it.  I also didn't begin the game as an Elf: I was polymorphed when I read a cursed book.  I hate elves on principle, but being polymorphed costs a point of Endurance.  As much as I hate Elves, I don't hate them enough to compromise my stats.

And now, the long-awaited victory sequence:


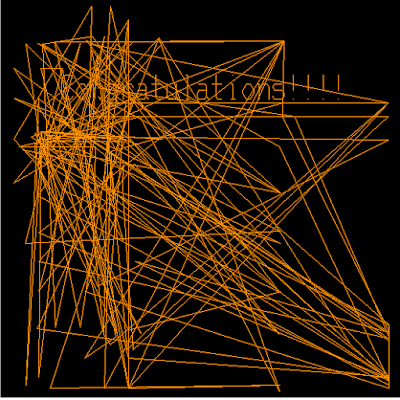
See that, above?  That's what I got for my efforts.  One word, marred by a bunch of vector lines.  There's an extreme pettiness to this, as though the creators of the game just refused to graciously congratulate anyone who beat the game.  There's also a certain amount of humour to be gained from the fact that I strove for a whole year just for this.  I laughed, anyway.


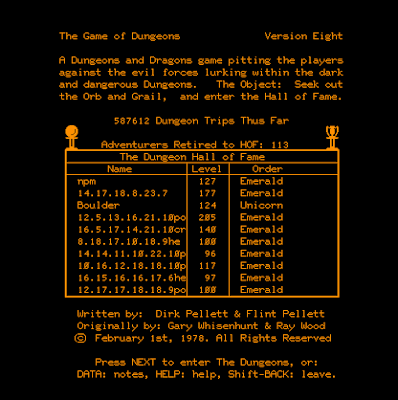
This is more like it: a leaderboard!  There I am, at the top, and even though my character had a terrible name, it's the second-best name on there.  Huzzah!  Huzzah for npm!

Having finished version 8 of The Game of Dungeons, I'm glad that I played it.  I very nearly didn't bother; I assumed that it would be slightly altered or improved from version 5, but basically the same game.  While there are similarities, the two are different enough that I would consider them different games.  It makes me wonder about the other versions, and in what ways they might have been different.  At this point in time they're lost to the ages, which is a damn shame.

The main reason I decided to play Version 8 is that I loved Version 5 so much: it's currently ranked second out of all the games I've played on the blog, and it's the top-rated RPG.  Version 8 is larger, longer, and more difficult, but there's one thing it isn't: better.  The earlier game was tight, and although it was difficult and featured perma-death, it wasn't so long that it felt like a slog.  Version 8 is a poster-child for the idea that bigger is not necessarily better.  It has a total of 90 dungeon levels, which would be a lot even in an RPG where you can save your game.  With perma-death, it's just way too many.

I guess I have to do a Final Rating for this, don't I?  It's a strange feeling to be boiling a year of my life down to a few numbers, but that's the nature of the blog, innit?  Besides, it's not like playing The Game of Dungeons is all I did in the last twelve months.  Watched a lot of pro-wrestling as well.  It's a life well lived.

FINAL RATING:

Story & Setting: Like most games of this vintage, these categories are virtually non-existent.  There's not so much a story as a goal: get the items from the dungeons.  Why are those items there?  Why are they important?  Why are those monsters guarding them?  Pretty basic questions given the set-up, but there are no answers forthcoming.  The story is the game, and the game is the story.  Rating: 1 out of 7.

Characters & Monsters: The game has a strong variety of monsters, with differing strengths and weaknesses, but by the end those differences get smoothed away because you can brute force your way through most encounters with little regard for tactics.  The monster variety is on a par with those in Version 5, with the main difference being the addition of the various slimes.  I'm not even sure they qualify for this category, as they're more obstacles than characters, so I'll rank this game equal to its predecessor.  Rating: 2 out of 7.

Aesthetics: The graphics are simple, and there's no sound, but I do love that orange-and-black PLATO colour scheme.  There's a lot to be said for graphics that are functional, as well.  Rating: 2 out of 7.

Mechanics: While combat and spellcasting in this game are simple (involving little more than a few keystrokes), the game has a lot of functions and implements them flawlessly.  Just think, how many times have you screwed up a keyboard-based game because of an errant keystroke?  It's happened to me more times than I can count, but in this game, which I played for a solid year, it didn't happen even once.  The key commands are set up in such a way that the really important ones are paired with the SHIFT or CTRL keys, which makes it really hard to screw things up.  I don't think I've ever played a game that has considered this so carefully, and I have to give it kudos for that.  Rating: 5 out of 7.

Challenge:  This is where this game is going to take a hit, because it's just too long.  I really like perma-death as a game feature, but it only works for very specific types of games.  While this is the right style of game to feature perma-death, it's exactly the wrong length.  I was prepared to rate this at the minimum score, but the ability to buy potions saves it.  If I'd figured that out earlier I would have finished this game months ago. Rating: 2 out of 7.

Innovation & Influence: I'm struggling to think of anything this game does that wasn't done better in other, earlier PLATO RPGs.  I was thinking that it might be the first RPG to feature multiple dungeons, but then I remembered Moria, which has four.  The use of slimes as a hazard is a first, though not a particularly notable one.  Rating: 2 out of 7.

Fun: I vaguely recall enjoying this game once, in the dim dark days when I first started playing it.  The fun long since drained out of the experience, and it simply became something I did.  It was part of my schedule, and by the end I was playing just to win, not because it was fun.  Rating: 1 out of 7.

Does this game earn the bonus point?  HELL NO.  The above scores total 15 , which doubled gives a Final Rating of 30.  That puts it fourth from the bottom, and the lowest-rated RPG on the list.  That's perhaps unfair: a lot of care went into the interface of the game.  It's a better game than, say, Space or Dungeon Campaign. It's just a shame that it was hurt by being so difficult and so, so interminably long.

ADDENDUM:

Somewhat later in this blog I made the decision to overhaul my Final Rating system, so I'm going back through and fixing all of the games I've already played as of March 2020.  I've ditched the Innovation and Influence category, and replaced it for CRPGs with a category for Combat.  I've also changed the purpose of the bonus points, saving them for games that are important, innovative, influential, or have features that are otherwise not covered by my other categories.

Also, the Final Rating is a boring name.  The CRPG Addict has his GIMLET.  The Adventure Gamers have their PISSED rating.  Data Driven Gamer has his harpoons.  So I'm ditching the generic name and calling my new system the RADNESS Index: the Righteous Admirability Designation, Numerically Estimating Seven Scores. It's a pretentious mouthful, but I'm going with it.

Combat: This version of the game's combat isn't all that different to that it version 5, so I'm giving it the same score.  Rating: 2 out of 7.

Bonus Points: 1. It's a significant part of the dnd lineage, and it's possible it was played by more people than v5.4. These games were in constant development, and at this point it's impossible to know which version was the most influential.

The Game of Dungeons v8's RADNESS Index is 31. That puts it equal 8th so far, and 5th out of seven CRPGs. It's significantly below v5.4, but I think it changed most of the things I really liked about that game for the worse.

NEXT: I've started Moria again, which is another PLATO RPG and could be another multi-month affair.  I'm pretty sure, though, that it might be the last massive mainframe RPG I have to tackle.  There's Oubliette, but I've heard that game is basically unwinnable as a single player.  My current plan is to go hard at Moria and get it out of the way.  It's going to harm the blog in the short term, but I really want to get these huge games behind me.

Sunday, August 28, 2016

The Game of Dungeons v8: Late Night Victory Post

It's too late to post in full, but I just have one thing to say.

I DID IT.  I WON.  I BEAT THE GAME OF DUNGEONS.


I started playing this game in August 28th, 2015.  I finished it on August 28th 2016, exactly one year later.  (Well, technically it's 3AM on the 29th, but I'm still counting it as a year.)  It's been a hard slog, but it's finally over.  I'll post a proper wrap-up soon, but I wanted to mark this occasion, and let my loyal readers know that I ain't dead yet,

In your faces, Dirk and Flint Pellett!  Victory is mine!

Saturday, July 16, 2016

The Game of Dungeons v8: Two Down...


I took me ten months to complete Whisenwood Dungeon.  A lesser (or perhaps I should say wiser) person would have quit a long time ago.  The second dungeon, thankfully, took me just one month, and it's all thanks to the Potion of Astral Form.

Seriously, from now on I am going to read the documentation thoroughly before I start a game.  The Game of Dungeons has been running in the background for almost a year of this blog, and there's no doubt that it's seriously impeded my progress.  Now the end is in sight, and it's all because the Potion of Astral Form allows me to map in near-total safety.  If I'd been paying attention, I'd have realised that a lot sooner.

The second dungeon of the game (although you can tackle them in any order, and switch between all three whenever you want) is the Tomb of Doom.  The goal at the bottom is the Grail, which is guarded by a Vampire.  The documentation is vague regarding the Vampire's abilities, and whether he's stronger than the game's regular vampires.  As you'll see later, I never really found out.  The cursory nature of combat in this game makes it hard to know exactly how strong your enemies are.  Either you kill them, or they kill you.  There are no drawn out fights, which is a blessing and a curse.  (In a game of this length and difficulty, I would say it's more of a blessing.)

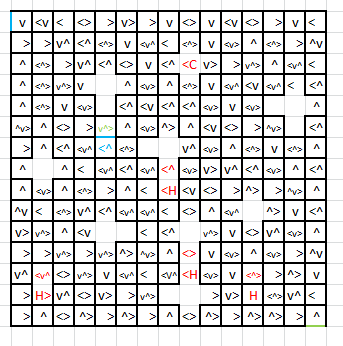
The maps are more complex in the Tomb of Doom than they were in Whisenwood.  The trick they most often rely on is repetition: lots of interlocking areas that appear exactly the same.  This is especially effective in The Game of Dungeons, because moving from one level to another always puts you in a random location.  Getting lost is easy, and even with a map getting your bearings can be difficult.  Here's an example of what I'm talking about, level 21 of the Tomb:


As you can see, it's repetitive as hell, and super-frustrating to map.  Without the Potion of Astral Form it would have taken me hours.  In addition to the repetition, pretty much all of the doors are one-way; you can pass through in the direction of the arrow, but you can't go back through from the other side.

Below is a map of level 19 of the Tomb, which may be the single most difficult RPG maze I have ever had the misfortune to encounter:


Seriously, just look at that thing.  How do you even make sense of it?  It's nothing but walls that exist on one side but not on the other, and I found it almost impossible to keep my bearings while exploring.  Without the Potion of Astral Form I'd have had no chance.  I very nearly gave up on mapping it, until my stubborn streak kicked in and I refused to be defeated.  I ended up mapping it systematically, starting in the bottom left corner and mapping row by row.  I'm not convinced that it's perfect, but it's as good as it's going to get.

Finding the Grail proved to be a bit more difficult than the Fountain at the bottom of Whisenwood, mostly due to the nature of Tomb level 30.  The tricky thing about this level is that it's loaded with transporters that send you back to level 29.  It's hard to move more than a few steps without stumbling into one.  I got it mapped eventually, but I know I haven't marked down every transporter on the level.  I got enough that I can navigate the map, but even on my last game I walked through one that I had missed.

With the mapping done, it was time to make a run for the Grail.  I was being extremely cautious; just as I had been using the Potion of Astral Form to help me map, I wasn't going to explore Level 30 without a Potion of Revival.  This meant grinding for treasure occasionally between forays, but it's worth it.  Even with the Potion of Revival dying is a setback: you lose all of your equipment, as well as a point of Endurance (which can result in a significant drop in hit points).  That said, it's better than losing your character altogether.  (Also, I've just realised something: it's possible that if I have to use a Potion of Revival from now on, I might lose the Grail.  I'll have to keep an eye on that.)

For my first ten forays into the dungeon, I wasn't able to find the Grail.  I'm not sure if it moves around like the Fountain, or if it's location is fixed.  With perma-death in effect, I'm not about to go back in to find out.  My character actually died on one my tenth foray: teleporting back to the surface backfired on me a few times, and I ran out of spell power on level 13.  I tried in vain to navigate my way out the old fashioned way, but without magic I was losing hit points with every battle, and I had to walk through slimes rather than kill them.  I didn't make it, but my Revival Potion saved me.  I lost all of my gear, one point of Endurance and about 100 hit points, but my caution had saved my character.

I'd like to say that the final, successful foray I made was the stuff of legend, but it was something of an anticlimax.  I stumbled across the Grail and the Vampire in the upper left of the map, and without thinking I cast the cleric spell Holy Word.  The Vampire died instantly, I claimed the Grail, and then I teleported back to the surface.  It's hard to get a good story out of it, you know?

So that's another dungeon down, but I feel more relieved than excited by it.  It will be a massive weight off my shoulders to put this game behind me.  I just mapped level 17 of the Caverns, so I'm well on the way.  As long as I can avoid stupid mistakes, I'm on the home stretch.  Thank fuck.

Wednesday, June 22, 2016

Colossal Cave Adventure II: Victory!

In my last post for this game, I was lamenting about how difficult it is to put a successful run together.  The version I was playing had no save game feature, and with the number of random elements involved it was really hard to collect all the treasures without dying.  I managed it eventually, but I had to switch to a different version of the game to do it.

As I mentioned in my last post, the biggest obstacle to winning the game was the time limit imposed by the lamp.  After a certain number of moves it runs out of power, and once that happens it's game over.  This was a tight race in the original Colossal Cave Adventure, and with five more treasures to collect in the remake it becomes even tighter.  My plan was to write a walkthrough, so that I at least knew that on a perfect run I'd be able to do it within the rrequired number of moves.  In the end I didn't write a step-by-step walkthrough: there are too many random elements that can change where you need to go.  Instead I wrote a rough guideline, that looked something like the following:

Step 1: Get the platinum pyramid using the PLUGH and PLOVER passwords
Step 2: Get the lamp and the keys, unlock the grate, return the keys to the house
Step 3: Collect the nugget, diamonds, rug, coins, jewelry and silver bars (all unguarded)
Step 4: Step outside and have a drink
Step 5: Collect the tusk, chalice, crown, and orb.
Step 6: Step outside and have a drink
Step 7: Collect the golden eggs, trident, pearl, and ruby
Step 8: Step outside and have a drink
Step 9: Collect the golden eggs, golden chain, spices
Step 10: Have a drink
Step 11: Collect the vase, the emerald and the pirate's chest

That's a very basic run-down of my plan.  The various treasures are grouped by location: those in Step 3 are all near the entrance, those in Step 5 are all near the chapel, and so on.  I also had to make a plan that made getting the golden eggs efficient.  The eggs are needed to solve two separate puzzles (the troll and the giant), and each time you give them away you need to use a magic word to return them to their starting location.  All up you have to retrieve them from the same location three times, which can eat up a lot of moves if you don't do things in the best order.  I found that tackling the giant before the troll worked best.

You'll also notice that I do a lot of drinking, and that's because you can die of thirst if you're not careful.  The thirst timer is connected to the amount of stuff you're carrying: the more gear you lug around, the quicker you get thirsty.  Initially I was carrying a bottle full of water with me at all times, but I found that this was too limiting for my inventory.  Instead I started drinking from the stream on the surface every time I returned to drop some treasures off.  This was fine as long as I remembered, and it allowed me to carry more items, which in turn allowed me to get the treasures in fewer moves.

Knowing when to turn the lamp off was also key to winning.  I would always turn it off before teleporting back to the surface, because you only need it to see when you're below ground.  I would also turn it off whenever I had to enter multiple commands without moving out of a location.  For instance, if I ever had to pick up more than one item I would turn off the lamp first.  You risk falling and breaking your neck if you move from one location to another with the lamp turned off, but any other actions are safe.  (Except for killing the dragon, which I found out the hard way.  For some reason, the game treats it as though you've moved, and sometimes you'll fall and die.  After that happened to me I started leaving my light on for that bit.)  Every little bit helps to make your lamp last longer; it can be fiddly, but it's vital to success.

Even with my plan, I ran into all sorts of difficulties.  The dwarves would kill me (a lot).  I'd take too many moves to escape from Witt's End after dropping the magazine (doing this adds 1 point to your score, but escaping is by random chance, and can eat up a lot of moves).  Sometimes the pirate wouldn't appear.  Sometimes he would appear at the wrong time, and mess up the sequence to an irreparable degree.  Every now and then I forgot to drink, and died of thirst.  I even forgot to turn my light back on a few times, and died in the dark by accident.  Most frustratingly of all, the endgame would sometimes activate before I could get all of the treasures back to the surface; I could get a victory this way, but not with full points.  There are any number of ways to mess up in this game, which makes a successful, flawless run from start to finish very difficult to achieve.  I got frustrated with it, and switched to a version with a save game feature.  Life's too short.

(The version I switched to can be played on-line at http://gobberwarts.com/, along with a lot of other classic adventure games.  It has a nifty map of the caves as well, which is cool if a bit spoilery.  Luckily for me I had already solved all of the puzzles.)

I collected all the treasures, but my lamp ran out of power before the endgame could start..

The endgame for Colossal Cave Adventure II is exactly the same as that in the original game.  After you've found all the treasures, a voice tells you that the cave is closing soon, and that you should leave by the main exit.  At this point the magic words that teleport you to the surface stop working, and the grate exit is locked.  There's no way out, and you have to pass the time until you are taken to the endgame  The trick is to pass that time without running out of lamp power, and dying in the dark; I did it by going to the room where the emerald is found, as it's one of the few rooms that has its own light source.

When the endgame activates you're taken to a storeroom containing many of the items and monsters from the game, including lots of sleeping dwarves.  If the dwarves wake up you'll be killed.  The solution here is that the room contains some black rods that are actually sticks of dynamite; you use the dynamite to blow up the dwarves, and escape.  I complained about this puzzle in the original game, because there's no foreshadowing or clues about it at all.  Pure guesswork is the only way to solve it.  Luckett and Pike had a chance to solve that problem here, but they left it as is, unfortunately.

Sweet victory

You'll notice above that I only got 436 out of 440 points.  That's a big part of what delayed this post; I would have had it up last week, but I spent far too long trying to find the last four points.  I have no idea how to get them.  I visited every location in the game, I took every item, I tried everything I could think of.  I even scoured the source code looking for the solution.  I couldn't find it, and I also couldn't find a walkthrough with a comprehensive point list.  So I had to give up on 436, which I'm not all that happy about.  If anyone knows the solution, I'd really appreciate it.

Scouring the source code usually turns up some fun things in text adventures, and this game was no exception.  I discovered a rather baffling sequence of events that happens if you drink from the reservoir using the chalice.


As far as I can tell this serves no purpose at all.  The chalice gets destroyed in the process, so even if you drink then refuse to help the princess it's a bad idea.  As pointless as it is though, it's more interesting than anything else the game has to offer.  There are all sorts of hints and implications towards an epic story here, but there's nothing else in the game that lives up to it.  I wonder if Pike and Luckett intended on expanding the game, but never got around to it?  Like I said, it's baffling, but oh so intriguing.

FINAL RATING:

Story & Setting: The setting is exactly that of Colossal Cave Adventure, with a bunch of new locations bolted on.  The story is also the same, only with more treasures to collect (and an intriguing sequence that's pointless but far more interesting than the main quest).  There's more here, but it's more of the same, and not interesting enough to rate any higher.  Rating: 1 out of 7.

EDIT: I noticed that my rating in this category for Colossal Cave Adventure was a 2, mostly due to superior writing and the realistic caves. Given that Colossal Cave Adventure II has the same level of writing, adds a bunch of new things and doesn't take anything away from the original game, it should have the same score in this category. Actual Rating: 2 out of 7.

Characters & Monsters: As in most text adventures of the era, the creatures you meet are more obstacles than actual characters.  The dwarves' can move items around now, which I guess gives them a bit more complexity, and there's the addition of a giant, an owl and a spider.  None of it's very inspiring though.  Rating: 1 out of 7.

Aesthetics: As usual, this being a text adventure gives it a distinct disadvantage in this category.  The writing is decently evocative, but it's not really on the level of a ZorkRating: 1 out of 7.

EDIT: Again, this game should have the rating here as Colossal Cave Adventure. Actual Rating: 2 out of 7.

Mechanics: This has all of the good and bad points of the original.  The parser is solid, but combat is clunky, and I feel like there are too many random elements.  Rating: 3 out of 7.

Challenge: I'm tempted to give this a score of 1, but I don't want to be negatively influenced by the hard time I had because I wasn't able to save my game.  That said, it still has the dynamite puzzle, which I hate, and random deaths are abundant.  There are also two new mazes added (albeit small ones).  I have to mark it low, for being difficult in ways that aren't fun.  Rating: 2 out of 7.

Innovation & Influence: Given that this is an expansion to an existing game, it has to rank low here.  Still, the thirst timer might be the first of its kind in adventure games, and the way that the dwarves move items around could be a first as well (depending on this game's release relative to Zork).  Rating: 2 out of 7.

EDIT: This is also the first expansion of Colossal Cave Adventure, something which becomes a sub-genre in its own right. I feel like that deserves an extra point.  Actual Rating: 3 out of 7.

Fun: I derived little more than mild enjoyment from this one, but that's from the perspective of having already played the original.  I would have enjoyed it much more coming to it fresh, but I can only rate it on the experience that I had.  Colossal Cave Adventure II adds some new things, but more often than not they're frustrating rather than enjoyable.  Rating: 2 out of 7.

Sorry game, no bonus point for you: I won't be playing you again.  The above scores total 13, which doubled gives a Final Rating of 26.

Final Rating: 24 out of 100.

EDIT: With the alterations I made above, the Actual Final Rating is 30 out of 100.

That's the lowest score for an adventure game on the list so far (and the lowest score for any game).  For comparison, the original Colossal Cave Adventure scored 44, which is significantly higher.  A score of 24 seems rather low; it really isn't the worst game I've played.  I think it suffered because it's so similar to the original.  My rating was mostly based on what's been added to the game, and that material is largely uninspiring.

EDIT: It's no longer the lowest-rated adventure game, but it's not far off. The new score seems a little fairer to me. Don't worry though, this is the only game I'm going to reassess. Everything else is set in stone.

ADDENDUM THE SECOND:

I guess everything wasn't set in stone.Somewhat later in this blog I made the decision to overhaul my Final Rating system, so I'm going back through and fixing all of the games I've already played as of March 2020.  I've ditched the Innovation and Influence category, and replaced it for adventure games with a category for Puzzles.  I've also changed the purpose of the bonus points, saving them for games that are important, innovative, influential, or have features that are otherwise not covered by my other categories.

Also, the Final Rating is a boring name.  The CRPG Addict has his GIMLET.  The Adventure Gamers have their PISSED rating.  Data Driven Gamer has his harpoons.  So I'm ditching the generic name and calling my new system the RADNESS Index: the Righteous Admirability Designation, Numerically Estimating Seven Scores. It's a pretentious mouthful, but I'm going with it.

Puzzles: This game keeps many of Colossal Cave Adventure's puzzles, and adds plenty more of its own. Most of those were either too difficult for me to figure out, or involved a lot of frustrating backtracking and rigmarole. A lot of that frustration came not so much from the puzzles themselves, though, but other random elements, like the dwarves.  Even so, I can't quite bring myself to rate this as highly as the original Colossal Cave Adventure.  Rating: 2 out of 7.

Bonus Points: 1. I'm giving this a bonus point for being the first significant expansion of Colossal Cave Adventure, something which became something of a genre all its own.

Colossal Cave Adventure II's RADNESS Index is 31.  That places it 8th so far, and 4th out of eight adventure games.

NEXT: I'm still working on finishing The Game of Dungeons v8, and I've also started A3, a sci-fi text adventure created using the Wander system.